This web development tutorial is part-3 in series of ASP.NET MVC Shopping Cart Application. In this three parts series, we tried to learn how to develop an Online Shopping Store Application using ASP.NET MVC, C#, Entity Framework and MS SQL Server?
So far we have covered the major features of an ASP.NET MVC Shopping Cart including ASP.NET MVC Project Setup, Administration of Categories and Products, Featuring Products, Product Display Center for end user, Product Search and Product details, End User Registration and Shopping Cart Management etc.
If you have directly landed to this Part of ASP.NET MVC Online Store Application, I’ll recommend to go through the previous parts of this Web Development Tutorial Series to understand the previously implemented features.
Now, we are going to complete it by covering the following features in this part:
- Checkout Option
- Shipping Details
- Payment Option (A dummy Page)
- Order Placement
- Order Summary on Successful Payment
- Administration – View/List Orders
- Administration – Single Order Detailed View
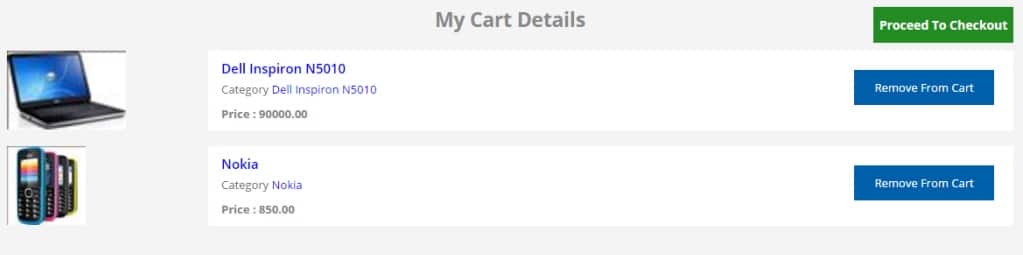
ASP.NET MVC Shopping Cart’s My Cart Details:
Let’s start with Shopping Cart Detail Page where user will find a “Proceed to Checkout” button as Checkout Option. Following screen is normally displayed when user add items to it’s Shopping Cart.
Now, Lets discuss about the implementation, for displaying cart details, there will be an action “MyCart” in “ShoppingController”. The action will contain following code:
/// <summary>
/// MyCart
/// </summary>
/// <returns>List of cart items</returns>
public ActionResult MyCart()
{
    List<USP_MemberShoppingCartDetails_Result> cd = _unitOfWork.GetRepositoryInstance<USP_MemberShoppingCartDetails_Result>().GetResultBySqlProcedure("USP_MemberShoppingCartDetails @memberId",
            new SqlParameter("memberId", System.Data.SqlDbType.Int) { Value = memberId }).ToList();
    return View(cd);
}
The data is fetched from database using stored procedure. The procedure is:
create proc USP_MemberShoppingCartDetails (@memberId int)
as Begin
select
      p.Price, p.ProductId, p.ProductImage, p.ProductName, c.CategoryName
from
      Tbl_Cart cr join Tbl_Product p on p.ProductId = cr.ProductId join Tbl_Category c
      on c.CategoryId=p.CategoryId join Tbl_Members m on m.MemberId=cr.MemberId
where
      m.MemberId=@memberId and cr.CartStatusId=1
End
View will contain following code:
@model List<OnlineShopping.DAL.USP_MemberShoppingCartDetails_Result>
@{
        ViewBag.Title = "MyCart";
        Layout = "~/Views/Shared/_FrontLayout.cshtml";
}
<style>
.checkout
{
        background-color: forestgreen;
        /* float: right; */
        top: 54px;
        width: 203px;
        right: 86px;
        font-size: 14px;
}
</style>

<div id="dvFilterSearch" style="margin-top:30px;">
 <div class="mainServices clearfix">
 <div class="container">
     <h2 style="margin:20px;text-align:center;font-weight:bold;">
              My Cart Details <a style=" " class="RemoveCartBtn checkout" href="/shopping/checkout">Proceed to Checkout</a>                 </h2>

     <!-- Start servicesRight-->
     <div class="servicesRight1">
     @if (Model.Count() > 0)
     {
           <!--Start pricelowHigh-->
           <div class="pricelowHigh clearfix">
           <!--Start Services Man-->
           <div class="tabContent" id="tab2">
           <!--Start Services Man-->
           <div class="servicesPerson1 clearfix">

            @foreach (var item in Model)
            {
               <!--Start detailServicesBox-->
               <div class="detailservicesBox clearfix">
               <div class="detailLeft fl">
               <div class="DservicesImg1">
                   @if (File.Exists(Server.MapPath(System.Configuration.ConfigurationManager.AppSettings["Produc tImage"] + "/Small/" + item.ProductId + "_" + item.ProductImage)))
                   {
                      <img style="height: 90px;" src="@(System.Configuration.ConfigurationManager.AppSettings["ProductImage"]+"/Small/"+it em.ProductId+ "_"+item.ProductImage)" alt="img" />
                   }
                   else
                   {
                      <img style="height: 90px;" src="@(System.Configuration.ConfigurationManager.AppSettings["ProductImage_Default"])" alt="img" />
                   }
               </div>
               </div>

               <div class="detailRight fr">
               <div class="innerDetails">
                  <h1><a title="View Product Detail" href="/search/ProductDetail?pId=@item.ProductId">@item.ProductName</a></h1>
                  <h3>Category <a style="cursor:pointer" title="Click to View the products of this category" href="/search/knowbleprofile?pId=@item.ProductId">@(item.ProductName)</a></h3>
                  <p><b>Price : </b><b>@item.Price</b></p>
                  <p><a href="/shopping/removecartitem?productId=@item.ProductId" onclick="show_progress();" class="RemoveCartBtn">Remove from cart</a></p>
               </div>
               </div>
               </div>
     }
     </div>
</div>
</div>
}
else
{
       <div class="tabContent" id="tab3">
       <div class="clearfix">
       <div class="detailservicesBox clearfix">
         <div style="background-color: #fff; text-align: center; padding: 40% 0; ">
            <h2>No Records found</h2>
         </div>
       </div>
       </div>
       </div>
}
</div>
</div>
</div>
</div>
Checkout Procedure for ASP.NET MVC Online Store:

To display the above screen, an action “CheckOut” will be there in “ShoppingController”.
“Checkout” action will contain following code:
/// <summary>
/// CheckOut the Cart items
/// </summary>
/// <returns></returns>
public ActionResult CheckOut()
{
       List<USP_MemberShoppingCartDetails_Result> cd = _unitOfWork.GetRepositoryInstance<USP_MemberShoppingCartDetails_Result>().GetResultBySqlProcedure ("USP_MemberShoppingCartDetails @memberId", new SqlParameter("memberId", System.Data.SqlDbType.Int)
                     { Value = memberId }).ToList();
       ViewBag.TotalPrice = cd.Sum(i => i.Price);
       return View(cd);
}
Stored procedure “USP_MemberShoppingCartDetails” will calculate the data displayed on the page.
CREATE proc USP_MemberShoppingCartDetails (@memberId int)

as Begin

Select p.Price, p.ProductId, p.ProductImage, p.ProductName, c.CategoryName
From Tbl_Cart cr join Tbl_Product p on p.ProductId=cr.ProductId join Tbl_Category c on c.CategoryId=p.CategoryId join  Tbl_Members m on m.MemberId=cr.MemberId
Where m.MemberId = @memberId and cr.CartStatusId = 1

End
The view will contain following code:
@model List<OnlineShopping.DAL.USP_MemberShoppingCartDetails_Result>
@{
   ViewBag.Title = "MyCart";
   Layout = "~/Views/Shared/_FrontLayout.cshtml";
}
<style>
  .checkout
  {
     background-color: forestgreen;
     top: 54px;
     width: 203px;
     right: 86px;
     font-size: 14px;
  }
</style>
<div id="dvFilterSearch" style="margin-top:30px;">
    <div class="mainServices clearfix">
        <div class="container">
              <h2 style="margin:20px;text-align:center;font-weight:bold;">
                 Checkout
              </h2>
                 <!-- Start servicesRight-->
                 <div class="servicesRight1">
                    @if (Model.Count() > 0)
                    {
                       <div style="background-color: white;  padding: 20px;">
                         <b>You have following @Model.Count() items in your cart</b>
                         <br /><br />
                         @foreach (var item in Model)
                         {
                             <h3>
                                 <a title="View Product Detail" href="/search/ProductDetail?pId=@item.ProductId">
                                    <b> @item.ProductName</b>,  </a>
                                    <span>Price : </span><b>@item.Price</b>
                             </h3>
                         }
                     </div>
                    }
                    else
                    {
                      <div class="tabContent" id="tab3">
                         <div class="clearfix">
                             <div class="detailservicesBox clearfix">
                             <div style="background-color: #fff; text-align: center; padding: 40% 0; ">
                                     <h2>No Records found</h2>
                             </div>
                         </div>
                       </div>
                     </div>
                    }
                    <br />
                    <br />
                    <h3 style="font-weight: bold;color: brown;"> Total Amount to Pay :
                       @Model.Sum(i => i.Price)</h3>
                       @Html.Partial("_ShippingAddress", new OnlineShopping.Models.ShippingDetails())
                  </div>
             </div>
       </div>
</div>

@model OnlineShopping.Models.ShippingDetails
@using (Html.BeginForm("PaymentSuccess", "Shopping"))
{
<div class="clearfix">
  <div class="container">

    @Html.AntiForgeryToken()
    <input name="TotalPrice" value="@ViewBag.TotalPrice" style="position: absolute;  visibility: hidden;" />
             <div class="formRow clearfix" style="margin:20px 0;">
                 <b>Select Payment Type*</b>
                 <div style="margin-top: 8px;">
                     <label for="radio-2" class="css-label">
                         @Html.RadioButton("PaymentType", "Pay Using Debit/Credit Card", new { @class = "css-checkbox" })
                         Pay Using Debit/Credit Card
                     </label>
                     <label for="radio-2" class="css-label">
                         @Html.RadioButton("PaymentType", "Pay Using Net banking", new { @class = "css-checkbox" })                         Pay Using Net banking                     </label>                     <label for="radio-2" class="css-label">                         @Html.RadioButton("PaymentType", "Cash On Delivery", new { @class = "css-checkbox" })                         Cash On Delivery                     </label>                     @Html.ValidationMessageFor(m => m.PaymentType)
                 </div>
             </div>
            <b>Shipping Address</b>
             <div class="formRow clearfix" style="margin-top: 8px;">
                 <label>Address*  @Html.ValidationMessageFor(m => m.Address)</label>
                 @Html.TextBoxFor(m => m.Address, new { @class = "inputComn", @placeholder = "Address" })
             </div>
             <div class="formRow clearfix">
                 <div class="half fl">
                     <label>City*  @Html.ValidationMessageFor(m => m.City)</label>
                     @Html.TextBoxFor(m => m.City, new { @class = "inputComn", @placeholder = "City" })
                 </div>
                 <div class="half fr">
                     <label>State*  @Html.ValidationMessageFor(m => m.State)</label>
                     @Html.TextBoxFor(m => m.State, new { @class = "inputComn", @placeholder = "State" })
                 </div>
             </div>
             <div class="formRow clearfix">
                 <div class="half fl">
                     <label>Country*  @Html.ValidationMessageFor(m => m.Country)</label>
                     @Html.TextBoxFor(m => m.Country, new { @class = "inputComn", @placeholder = "Country" })
                 </div>
                 <div class="half fr">
                     <label>Zip Code*  @Html.ValidationMessageFor(m => m.ZipCode)</label>
                     @Html.TextBoxFor(m => m.ZipCode, new { @class = "inputComn", @placeholder = "Zip Code" })
                 </div>
             </div>
             <input type="submit" class="contactBtn signupBtn" value="Proceed to Pay" />
  </div>
</div>
}
Following model will validate the address:
public class ShippingDetails
     {
         public string OrderId { get; set; }
         [Required]
         public string Address { get; set; }
         [Required]
         public string City { get; set; }
         [Required]
         public string State { get; set; }
         [Required]
         public string Country { get; set; }
         [Required]
         public string ZipCode { get; set; }
         public decimal TotalPrice { get; set; }
         [Required]
         public string PaymentType { get; set; }
     }
User will fill the shipping address and select payment type. After that, he/she will click on “Proceed to Pay”. System will apply proper validations in case of any missing required field and display the appropriate message.
Once user click on “Proceed to Pay” after providing valid details, payment will be done and a screen with success message will appear as follows: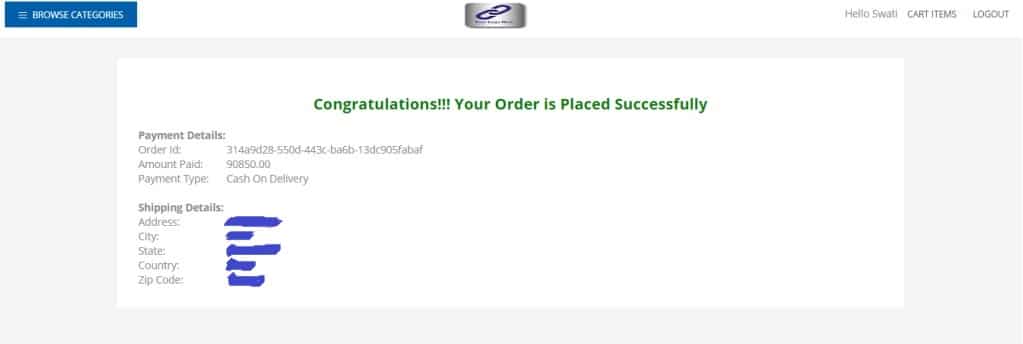
An order will be placed successfully and record will be updated in database. Here for the sake of simplicity, we are not integrating with any payment gateway right now. There are many other features that can be added to enhance this article series but for now we want to help fellow developers understand and get primary knowledge of developing an online shopping cart application in ASP.NET MVC.
For payment completion, there will be an action “PaymentSuccess” in “ShoppingController”,
/// <summary>
/// Payment Success
/// </summary>
/// <param name="shippingDetails"></param>
/// <returns></returns>
public ActionResult PaymentSuccess(ShippingDetails shippingDetails)
{
     Tbl_ShippingDetails sd = new Tbl_ShippingDetails();
     sd.MemberId = memberId;
     sd.AddressLine = shippingDetails.Address;
     sd.City = shippingDetails.City;
     sd.State = shippingDetails.State;
     sd.Country = shippingDetails.Country;
     sd.ZipCode = shippingDetails.ZipCode;
     sd.OrderId = Guid.NewGuid().ToString();
     sd.AmountPaid = shippingDetails.TotalPrice;
     sd.PaymentType = shippingDetails.PaymentType;

     _unitOfWork.GetRepositoryInstance<Tbl_ShippingDetails>().Add(sd);
     _unitOfWork.GetRepositoryInstance<Tbl_Cart>().UpdateByWhereClause(i => i.MemberId == memberId && i.CartStatusId == 1, (j => j.CartStatusId = 3));
     _unitOfWork.SaveChanges();

      return View(sd);
}
The view will contain following code:
@model OnlineShopping.DAL.Tbl_ShippingDetails
@{
ViewBag.Title = "PaymentSuccess";
Layout = "~/Views/Shared/_FrontLayout.cshtml";
}
<div id="dvFilterSearch" style="margin-top:30px;">
<div class="mainServices clearfix">
<div class="container">
<div style="background-color:white;margin-top:40px;padding:30px">
<h2 style="margin:20px;text-align:center;font-weight:bold;color:green;">
Congratulations!!! Your Order is Placed Successfully
</h2>
<div class="servicesRight1">
<table>
<tr><td><b>Payment Details:</b></td><td> </td></tr>
<tr><td>Order Id:</td><td>@Model.OrderId</td></tr>
<tr><td>Amount Paid:</td><td>@Model.AmountPaid</td></tr>
<tr><td>Payment Type:</td><td>@Model.PaymentType</td></tr>
<tr><td><b> </b></td><td> </td></tr>
<tr><td><b>Shipping Details:</b></td><td> </td></tr>
<tr><td>Address:</td><td>@Model.AddressLine</td></tr>
<tr><td>City:</td><td>@Model.City </td></tr>
<tr><td>State:</td><td>@Model.State</td></tr>
<tr><td>Country:</td><td>@Model.Country</td></tr>
<tr><td>Zip Code:</td><td>@Model.ZipCode</td></tr>
</table>
</div>
</div>
</div>
</div>
</div>
There will be a table “Tbl_ShippingDetails” to capture shipping details.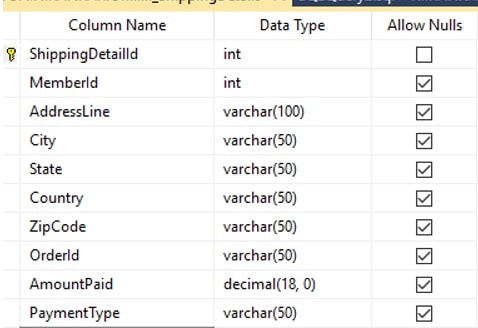
So far we covered the end user part of choosing a product, adding to shopping cart and finally placing an order. Now onward, we will covering the admin part for the order being placed.
Online Shopping Cart – Orders Management
Once the user’s online transaction is completed in an online store, another important area to cover is the “Order Management”. Administrator should be able to view all orders that are placed online and further proceed operationally to fulfill those orders.
To facilitate administrator for these operational activities, Orders list view and detailed view are really important and that’s what we are going cover here.
Order List View:
This page will display all orders corresponding to a product. Screen will look as:

On click of view detail or the order count, admin can see the order details further. Lets go through the code for Oder List View first:
/// <summary>
/// All orders
/// </summary>
/// <returns></returns>
public ActionResult Orders()
{
   List<Tbl_Cart> AllOrders = _unitOfWork.GetRepositoryInstance<Tbl_Cart>().GetListByParameter(i => i.CartStatusId == 3).ToList();
   return View(AllOrders);
}

@model List<OnlineShopping.DAL.Tbl_Cart>
@{
     ViewBag.Title = "Orders";
     Layout = "~/Views/Admin/_AdminLayout.cshtml";
     var orders = Model.GroupBy(i => i.ProductId).Select(i => i.FirstOrDefault()).ToList();
}

<div class="rightpart">
    <div class="sechBx clearfix">
       <div class="bretcrum">Dashboard</div>
    </div>
    <div class="dashBx">
        <div class="dashboardHD"> Orders</div>
        <div class="dashTable" id="rootId">
           @if (orders.Count() > 0)
           {
               <table id="tblId">
                   <thead>
                      <tr>
                          <th>Sr. No.</th>
                          <th>Product</th>
                          <th>Category</th>
                          <th>Price</th>
                          <th>Orders Count</th>
                          <th>Action</th>
                      </tr>
                   </thead>
               <tbody>
                    @foreach (var item in orders)
                    {
                        <tr>
                          <td>@(orders.IndexOf(item) + 1)</td>
                          <td><a style="color:cornflowerblue" title="Click to see the product detail" href="/admin/ProductDetail?productId=@item.ProductId"> @item.Tbl_Product.ProductName</a></td>
                          <td>@item.Tbl_Product.Tbl_Category.CategoryName</td>
                          <td>@item.Tbl_Product.Price</td>
                          <td><a style="color:cornflowerblue" href="/admin/orderdetail?productId=@item.ProductId" title="Click to view order detail"> @Model.Where(i => i.ProductId == item.ProductId).Count()</a></td>
                          <td class="ListButtons">
                              @Html.ActionLink("View Deatil", "orderdetail", "admin", new { productId = item.ProductId }, new { @class = "editBtn" })
                          </td>
                        </tr>
                     }
               </tbody>
              </table>
            }
            else
            {
              <table id="tblId1">
                 <thead>
                   <tr>
                       <th>Sr. No.</th>
                       <th>Product</th>
                       <th>Category</th>
                       <th>Orders Count</th>
                       <th>Action</th>
                   </tr>
                 </thead>
                 <tbody>
                     <tr><td colspan="5">No records found</td></tr>
                 </tbody>
              </table>
            }
        </div>
   </div>
</div>

@section js{
  <script>
       $(document).ready(function () {
         $('#tblId').dataTable({
            columnDefs: [
             { orderable: false, targets: -1 }
            ]
         });
       });
   </script>
}
- Learn ASP NET MVC 5 step by step [Maruti Makwana, Corporate Trainer]
28 Lectures, 2.5 Hours Video, Intermediate Level
Very easy to learn video series on Asp.Net MVC 5 Specially for those who are familiar with Asp.Net Web forms. - AngularJS for ASP.NET MVC Developers [Brett Romero]
10 Lectures, 1 hour video, Intermediate Level
The Fastest Way For .NET Developers To Add AngularJS To Their Resume - ASP.NET with Entity Framework from Scratch
[Manzoor Ahmad, MCPD | MCT] 77 Lectures, 10 hour video, All Level
Latest approach of web application development - Comprehensive ASP.NET MVC [3D BUZZ]
34 lectures, 14 Hours Video, All Levels
From zero knowledge of ASP.NET to deploying a complete project to production.
Single Order Detail View:
This page will display the customer details of the product. The page will look as :

Code for Detailed Page is here:
/// <summary>
/// Order details of a product
/// </summary>
/// <param name="productId"></param>
/// <returns></returns>
public ActionResult OrderDetail(int productId)
{
    List<Tbl_Cart> ProductOrders = _unitOfWork.GetRepositoryInstance<Tbl_Cart>().GetListByParameter(i => i.CartStatusId == 3 && i.ProductId == productId).ToList();
    return View(ProductOrders);
}

@model List<OnlineShopping.DAL.Tbl_Cart>
@{
    ViewBag.Title = "Order Detail";
    Layout = "~/Views/Admin/_AdminLayout.cshtml";
}
<div class="rightpart">
  <div class="sechBx clearfix">
    <div class="bretcrum">Dashboard</div>
  </div>
  <div class="dashBx">
    <div class="dashboardHD"> Order Detail</div>
      <div class="dashTable" id="rootId">
         @if (Model.Count() > 0)
         {
           <table id="tblId">
             <thead>
               <tr>
                  <th>Sr. No.</th>
                  <th>Product</th>
                  <th>Member Name</th>
                  <th>Email</th>
               </tr>
             </thead>
             <tbody>
                @foreach (var item in Model)
                {
                    <tr>
                      <td>@(Model.IndexOf(item) + 1)</td>
                      <td><a style="color:cornflowerblue" title="Click to see the product detail" href="/admin/ProductDetail?productId=@item.ProductId"> @item.Tbl_Product.ProductName</a></td>
                      <td>@(item.Tbl_Members.FirstName + " " + item.Tbl_Members.LastName)</td>
                      <td>@item.Tbl_Members.EmailId</td>
                    </tr>
                }
             </tbody>
           </table>
       }
       else
       {
           <table id="tblId1">
             <thead>
                <tr>
                   <th>Sr. No.</th>
                   <th>Product</th>
                   <th>Member Name</th>
                   <th>Email</th>
                </tr>
             </thead>
             <tbody>
                <tr><td colspan="4">No records found !!!</td></tr>
             </tbody>
           </table>
       }
    </div>
  </div>
</div>

@section js{
   <script>
       $(document).ready(function () {
            $('#tblId').dataTable({
                  columnDefs: [
                { orderable: false, targets: -1 }
                   ]
            });
       });
   </script>
}
This was all about a basic ASP.NET MVC Online Shopping Store Application using C#, Entity Framework (EF) and SQL Server. We have tried to provide and explain the maximum details with code snippet for better understanding with a developer point of view. But if you still have a question in mind or want some specific feature to be added, feel free to post here. We will try our best to answer and enhance this Online Store App further.
Part 2 – Building ASP.NET MVC Shopping Cart Application
Complete Source Code for the ASP.NET MVC Shopping Cart application will be available shortly.
:::To test your ASP.NET MVC Skills, take a free Online Test:::
Enjoy ASP.NET MVC Programming!
Advanced Web Developer Interview Questions and Answers Series:
- Top 10 HTML5 Interview Questions
- Top 10 ASP.NET Interview Questions
- Comprehensive Series of ASP.NET Interview Questions
- Top 10 ASP.NET MVC Interview Questions
- Top 10 ASP.NET Web API Interview Questions
- Top 10 ASP.NET AJAX Interview Questions
- Top 10 WCF Interview Questions
- Comprehensive Series of WCF Interview Questions
- Top 20 AngularJS Interview Questions
- Top 15 Bootstrap Interview Questions
The post ASP.NET MVC Shopping Cart with C#, EF, SQL Server-Part3 appeared first on Web Development Tutorial.